Practice outdoors to energize the body, calm the mind, and find a stronger, steadier version of yourself. In this article you’ll learn 10 accessible outdoor yoga poses that build strength, balance, and mental resilience — with complete how-to steps, safe modifications, progressions, frequency guidelines, and short sample mini-plans you can use right away. If you have any medical condition, are pregnant, recovering from injury, or unsure about starting a new exercise program, consult a qualified healthcare professional before beginning.
Key takeaways
- Outdoor yoga combines physical strength-building with mood and attention benefits from nature exposure.
- Daily short practices (10–30 minutes) plus 2–3 weekly longer sessions can deliver visible gains in strength, balance, and stress reduction.
- Each pose below includes beginner-friendly modifications, progressions, safety tips, and a tiny 2–3 step mini-plan you can try immediately.
- Warm-up, alignment, and gradual progress reduce injury risk; common yoga injuries are usually strains or sprains but are avoidable with good technique.
Why outdoor yoga? Quick science-backed benefits (short primer)
Practicing yoga outdoors adds measurable mental and physical benefits beyond an indoor mat. Time in natural settings improves mood, attention, blood pressure, and recovery from stress. Combining the deliberate movement and breath of yoga with nature’s restorative effects creates a potent mind–body workout: strength, flexibility, balance, and calmer stress responses all together. ScienceDirect
From a fitness-guideline perspective, building strength through bodyweight poses and regular practice contributes directly to weekly activity targets recommended for adults. Strength-focused yoga and regular balance work also help reduce fall risk and improve functional movement.
Quick-start checklist & warm-up (5 minutes)
Before you step onto the grass or onto a flat rock:
- Check the surface. Choose a flat, non-slip patch (yoga mat, towel, or grass).
- Weather & sun. Morning or late afternoon are ideal; bring sun protection and water.
- Gear. Lightweight mat or towel, comfortable clothes, and optionally a strap or block.
- Warm-up (3–5 minutes): marching in place, shoulder rolls, gentle neck circles, 6–8 cat–cow cycles, 4–6 slow hip circles.
- Timing tip: even 10 minutes daily helps; aim for 2 sessions per week of 20–40 minutes for noticeable strength gains.
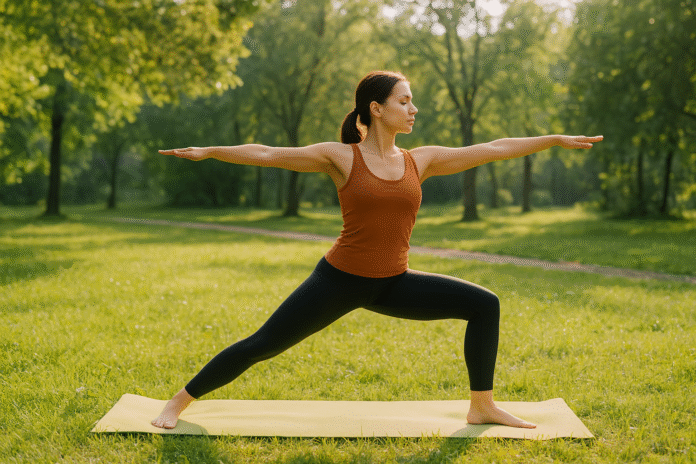
Warrior II (Virabhadrasana II)
What it is & core benefits
Warrior II is a foundational standing pose that strengthens the legs, opens the hips and chest, and builds stamina and focus. It develops endurance in the quads, glutes, and core while training the balance system for sustained holds.
Requirements / low-cost alternatives
- Equipment: none required; optional mat.
- Cost: free.
- Low-cost alternatives: practice the stance near a wall for light support or reduce depth of the bend.
Step-by-step instructions (beginner-friendly)
- From standing, step feet 3–4 feet apart (adjust for height). Turn your right foot out 90°, left foot slightly in.
- Bend the right knee so it stacks over the ankle; press evenly through both feet.
- Extend arms parallel to the ground, gaze over the right fingertips, draw the ribs in, and lengthen spine.
- Hold 30–60 seconds, breathing steadily. Repeat on other side.
Beginner modifications & progressions
- Modification: shorten stance and keep knee bend shallow.
- Wall support: practice with back heel touching a wall to check foot alignment.
- Progression: deepen the lunge, lengthen hold to 90 seconds, or add small pulses in and out of the knee bend for muscular endurance.
Recommended frequency / duration / metrics
- Frequency: 3–5 times per week as part of standing sequence.
- Duration: 30–90 seconds per side.
- Metrics: track hold time and knee alignment (knee tracking over second toe) to measure progress.
Safety, caveats & common mistakes
- Avoid letting the front knee collapse inward.
- Keep hips level — don’t twist the torso to over-rotate.
- If you have knee pain, reduce depth and use a higher stance.
Mini-plan (2–3 steps)
- Warm-up hips with 6 hip circles.
- 3 rounds: 45 seconds Warrior II right / 15 seconds gentle forward fold / 45 seconds Warrior II left.
- Finish with 30 seconds child’s pose.
Tree Pose (Vrksasana)
What it is & core benefits
Tree pose strengthens the ankles, calves, and core while training single-leg balance and proprioception. It enhances concentration and calm through a steady gaze and slow breath.
Requirements / low-cost alternatives
- Equipment: none. Optional: wall nearby.
- Low-cost alternative: practice standing near a tree, touching the bark lightly for support.
Step-by-step instructions
- Stand tall, shift weight into left foot. Anchor left foot firmly.
- Bend right knee, bring sole to inner left calf or inner thigh (avoid pressing on the knee).
- Find a steady drishti (gaze), hands in prayer at chest or overhead.
- Hold 20–60 seconds. Repeat other side.
Beginner modifications & progressions
- Modification: rest toes on the ground or keep foot at ankle.
- Wall modification: lightly touch a wall for balance.
- Progression: close eyes for 5–10 seconds to increase challenge; hold overhead with arms; hold 90+ seconds.
Recommended frequency / duration / metrics
- Frequency: daily micro-practice (1–3 minutes) or included in workouts 3–4x/week.
- Duration: start 20–30 seconds, progress to 60–90.
- Metrics: number of steady unaided holds, ability to close eyes and hold.
Safety, caveats & common mistakes
- Avoid placing foot on the knee joint.
- Don’t grip the supporting foot tightly — aim for light connection and lifted standing leg.
- If dizziness occurs, lower hands and focus on breath.
Mini-plan (2–3 steps)
- 2-minute balance warm-up: march in place, single-leg taps.
- 3 sets: Tree 30s right / rest 15s / Tree 30s left.
- Finish with relaxed standing forward fold.
Downward-Facing Dog (Adho Mukha Svanasana)
What it is & core benefits
Downward Dog is a full-body, foundational pose that strengthens shoulders, arms, and legs while lengthening the spine. It builds upper-body stability and relieves tension in the back and hamstrings.
Requirements / low-cost alternatives
- Equipment: yoga mat recommended for grip.
- Low-cost alternative: use a folded towel on grass.
Step-by-step instructions
- Start on hands and knees, hands shoulder-width, knees under hips.
- Tuck toes, lift hips up and back to form an inverted V.
- Press palms into ground, draw hips up, and keep a soft bend in knees if hamstrings are tight.
- Hold 30–90 seconds with steady breaths.
Beginner modifications & progressions
- Modification: practice against a wall, hands on wall at hip height, hips back to create angle.
- Progression: lift one leg for 3–5 breaths (three-legged dog) to increase shoulder and core demand.
Recommended frequency / duration / metrics
- Frequency: include in every session as a transition pose; 2–3 longer holds weekly for strength.
- Duration: 30–90 seconds.
- Metrics: ability to maintain neutral neck, lengthen spine, and increase hold time.
Safety, caveats & common mistakes
- Avoid collapsing through shoulders — imagine broad collarbones.
- If you have carpal tunnel or wrist pain, do forearm plank variations or use fists.
- Don’t lock elbows; micro-bend to protect joints.
Mini-plan (2–3 steps)
- Warm-up wrists and shoulders for 2 minutes.
- 3 rounds: Down Dog hold 45s / 10 slow sunbeams (walk heels toward hands) / Child’s pose 30s.
- End with gentle shoulder rolls.
Chair Pose (Utkatasana)
What it is & core benefits
Chair pose is a powerful lower-body and core builder that simulates a squat. It strengthens quads, glutes, calves, and the deep core muscles for lifting and stability.
Requirements / low-cost alternatives
- Equipment: none; optional block to sit back onto for form feedback.
- Low-cost alternative: practice sitting back onto a park bench lightly to find the hinge.
Step-by-step instructions
- Stand with feet hip-width. Inhale arms overhead.
- Exhale, bend knees and sit hips back as if lowering into a chair.
- Keep weight in heels, knees tracking over toes, ribs drawn in.
- Hold 20–45 seconds; repeat 2–3 times.
Beginner modifications & progressions
- Modification: hands on hips or in prayer; reduce depth.
- Progression: hold for 60–90 seconds, add pulsing, or hold weight-bearing (1–2 kg) in each hand.
Recommended frequency / duration / metrics
- Frequency: 2–4 times weekly for strength gains.
- Duration: work toward 60s holds; compare perceived exertion across sessions.
- Metrics: number of sets and hold time; reduced breathlessness for same hold indicates improved fitness.
Safety, caveats & common mistakes
- Don’t let knees extend beyond toes forcefully; hinge from hips.
- Monitor lower back — keep neutral lumbar curve.
- If you have knee issues, reduce depth and focus on alignment.
Mini-plan (2–3 steps)
- Warm-up hips with 6 lunges each side.
- 3 sets: Chair 30s / 20s rest.
- Finish with standing quad stretch.
High Plank / Low Plank Flow (Phalakasana → Chaturanga)
What it is & core benefits
Plank variations are prime for core, shoulder, and upper-body strength. Moving from high plank to low plank builds dynamic control, scapular stability, and muscular endurance.
Requirements / low-cost alternatives
- Equipment: mat or soft surface.
- Low-cost alternatives: perform against a picnic bench or low wall for incline plank.
Step-by-step instructions
- From hands and knees, step back into high plank (shoulders over wrists).
- Engage core, lengthen through heels, then lower halfway into low plank (hover ~2–4 inches above ground).
- Press back into high plank or lower all the way to the ground and press up. Repeat 6–10 reps with control.
Beginner modifications & progressions
- Modification: knees-down plank for reduced load.
- Progression: increase reps, time under tension, or add shoulder taps and slow lowers.
Recommended frequency / duration / metrics
- Frequency: 3–5x per week.
- Duration: aim for total plank accumulation of 2–6 minutes per session (broken into holds/reps).
- Metrics: total hold time, number of controlled lowers, and ability to maintain neutral spine.
Safety, caveats & common mistakes
- Avoid sagging low back — draw navel to spine.
- Keep neck neutral; don’t crane head forward.
- If wrists hurt, make fists or use forearm plank.
Mini-plan (2–3 steps)
- 2 sets: High plank hold 30s.
- Flow 5 reps: High plank → 3-breath lower hover → press up → rest 20s.
- Finish with child’s pose.
Crescent Lunge (Anjaneyasana)
What it is & core benefits
Crescent lunge opens hip flexors, builds leg strength, and challenges core stability. The pose helps counteract sitting-related tightness and enhances functional single-leg strength.
Requirements / low-cost alternatives
- Equipment: mat recommended.
- Low-cost alternative: use a rolled towel under back knee for cushioning.
Step-by-step instructions
- From standing, step one foot back into a long lunge. Front knee stacks over ankle.
- Keep back leg strong; tuck tailbone slightly to protect lower back.
- Reach arms overhead and breathe into the hip flexor stretch. Hold 20–45 seconds per side.
Beginner modifications & progressions
- Modification: hands on hips or blocks at sides for balance.
- Progression: lift arms and add small pulses, or hold for longer; try adding a gentle backbend.
Recommended frequency / duration / metrics
- Frequency: include in leg days 2–3x/week.
- Duration: 20–60s per side.
- Metrics: hip flexor flexibility (how far pelvis tilts), ability to maintain neutral spine.
Safety, caveats & common mistakes
- Avoid overarching the lower back — engage core.
- Watch front knee alignment.
- If knee pain occurs, use padding or shorten stance.
Mini-plan (2–3 steps)
- Warm-up with walking lunges (8–10 steps).
- 2 sets: Crescent Lunge 40s each side.
- Finish with gentle hamstring stretch.
Boat Pose (Navasana)
What it is & core benefits
Boat pose is a concentrated core builder that strengthens the abdominals, hip flexors, and spinal stabilizers. It also improves posture and balance in seated positions.
Requirements / low-cost alternatives
- Equipment: optional small towel under sit bones.
- Low-cost alternative: seated knee lifts one at a time if full boat is too intense.
Step-by-step instructions
- Sit tall, knees bent, feet on the ground. Hold behind thighs.
- Lean back slightly, lift feet so shins are parallel to ground (half-boat), or straighten legs to full boat.
- Hold 10–30 seconds, breathing smoothly.
Beginner modifications & progressions
- Modification: keep hands behind knees for support or practice half-boat with knees bent.
- Progression: increase hold time, straighten legs, then add pulses or a slow V-sit lift.
Recommended frequency / duration / metrics
- Frequency: 3–4x/week as core session.
- Duration: accumulate 60–120 seconds total per session.
- Metrics: time held with neutral spine, reduction in chest collapse.
Safety, caveats & common mistakes
- Avoid rounding the lower back; keep chest open.
- If lower back pain appears, reduce lean-back angle and keep hands supporting.
- People with herniated discs should consult a clinician before deep core holds.
Mini-plan (2–3 steps)
- 3 rounds: Boat 20s / rest 15s / half-boat 15s.
- Finish with reclining twist to release the low back.
Bridge Pose (Setu Bandha Sarvangasana)
What it is & core benefits
Bridge pose strengthens the glutes, hamstrings, and lower back while opening the chest and hip flexors. It’s a restorative strength builder for posterior chain muscles.
Requirements / low-cost alternatives
- Equipment: mat, optional block under sacrum for supported bridge.
- Low-cost alternative: perform glute bridges on a towel on grass.
Step-by-step instructions
- Lie on your back, knees bent, feet hip-width.
- Press through heels, lift hips toward the sky while drawing hips forward.
- Hold 20–45 seconds; lower with control.
Beginner modifications & progressions
- Modification: supported bridge with a block under sacrum for passive hold.
- Progression: single-leg bridge lifts (one leg extended, lift hips), or hold for longer sets.
Recommended frequency / duration / metrics
- Frequency: 2–4x/week.
- Duration: 3–4 sets of 20–45s holds or 8–12 reps single-leg progressions.
- Metrics: increased hip extension range and stronger glute contractions.
Safety, caveats & common mistakes
- Don’t overextend the lower back — lift through glutes and core engagement.
- Keep knees tracking over hips; avoid letting them splay outward.
- If neck issues exist, avoid pressing into the neck — keep chin slightly tucked.
Mini-plan (2–3 steps)
- Warm-up with 10 glute bridges.
- 3 sets: Bridge hold 30s / 10s rest.
- Finish with supine hamstring stretch.
Eagle Pose (Garudasana)
What it is & core benefits
Eagle pose wraps the limbs to create a deep balance and coordination challenge. It strengthens the ankles, calves, hips, and shoulders while enhancing proprioception and focus.
Requirements / low-cost alternatives
- Equipment: none. Wall optional for support.
- Low-cost alternative: sit on a bench and cross legs for a seated variation to find the bind.
Step-by-step instructions
- Stand and shift weight to left foot. Cross right thigh over left, hook right foot behind left calf if possible.
- Cross left arm under right at elbows, bring palms to touch if available.
- Sink slightly into standing leg; hold 20–40 seconds. Repeat other side.
Beginner modifications & progressions
- Modification: keep toes of wrapped foot on ground for balance.
- Progression: deepen wrap and work toward full arm bind; close eyes for brief bursts.
Recommended frequency / duration / metrics
- Frequency: include weekly for balance and coordination (2–3x/week).
- Duration: 20–60s per side.
- Metrics: number of unaided holds and ability to bind arms.
Safety, caveats & common mistakes
- Avoid pulling on shoulder joints in the arm bind; keep shoulders soft.
- If you have knee or hip injuries, skip deep leg bind and practice seated alternatives.
Mini-plan (2–3 steps)
- Single-leg awareness warm-up: 10 taps per foot.
- 3 sets: Eagle 30s per side.
- Finish with ankle rolls and gentle calf stretch.
Wild Thing (Camatkarasana)
What it is & core benefits
Wild Thing is a heart-opening backbend that strengthens the shoulders, arms, glutes, and lateral body while improving spinal mobility and joyful openness. It trains dynamic strength and coordination.
Requirements / low-cost alternatives
- Equipment: mat for cushioning.
- Low-cost alternative: practice a low backbend from kneeling or supported bridge to build confidence.
Step-by-step instructions
- From downward dog or side plank, shift weight onto right hand/foot and flip the left foot behind you so the chest opens upward.
- Lift hips; reach left arm overhead and gaze soft.
- Hold briefly (10–20 seconds) and exit slowly.
Beginner modifications & progressions
- Modification: practice from a supported side plank with knee down.
- Progression: hold longer, deepen the arch, and explore controlled transitions between side plank and wild thing.
Recommended frequency / duration / metrics
- Frequency: 1–3x/week as a dynamic mobility/strength element.
- Duration: 10–30s per side.
- Metrics: ease of entry and exit, shoulder stability, hip mobility.
Safety, caveats & common mistakes
- Warm shoulders and spine well beforehand.
- Avoid if you have acute shoulder or low-back injury unless cleared.
- Exit slowly to avoid sudden compression in the lower back.
Mini-plan (2–3 steps)
- 1–2 minutes shoulder warm-up: arm circles, scapular push-ups.
- Practice 3 gentle Wild Things per side with mindful exit.
- Finish in child’s pose.
Troubleshooting & common pitfalls (and fixes)
- Wobbly balance: reduce stance width, practice near a wall, use a focal point (drishti), and shorten hold times before increasing.
- Shoulder pain in weight-bearing poses: check scapular engagement (shoulders draw down away from ears), use forearms or knees, and strengthen rotator cuff with targeted exercises.
- Knee discomfort in lunges/chair: shorten stride, ensure knee tracks over second toe, use padding under back knee, and build glute strength gradually.
- Lower-back strain in backbends or plank: engage core before lifting, keep neutral pelvis, and avoid forcing range of motion.
- Fatigue & breathlessness: scale back holds, practice breath control (4–6 slow breaths), and gradually increase total workload.
How to measure progress (simple, practical metrics)
- Duration metrics: total minutes of practice per week, hold times for poses (e.g., number of seconds held in Warrior II or Plank).
- Strength markers: number of controlled plank-to-low-plank lowers, single-leg balance holds without support, number of single-leg bridges.
- Mobility tests: hip extension range in Crescent Lunge, chest opening in Bridge pose measured by how much the chest lifts without neck compression.
- Well-being metrics: subjective sleep quality, stress ratings (1–10), and mood before/after sessions (simple 1–5 scale).
- Consistency metric: number of practice days per week (aim 3+).
A simple 4-week starter roadmap (outdoor-focused)
Goal: build foundational strength, balance, and a steady breath practice, 4 weeks. Target: 3–4 sessions/week, 20–40 minutes.
- Week 1 (foundation): 3 sessions; daily 10–15 minute micro-practice. Focus: alignment, short holds (20–30s), poses: Warrior II, Tree, Down Dog, Chair, Bridge.
- Week 2 (build endurance): 3 sessions + 1 optional short balance session. Increase hold times by 15–30s; add Boat pose core sets and 1–2 flows of plank→low plank.
- Week 3 (challenge & variety): 4 sessions. Add Eagle and Crescent Lunge more fully, introduce one Wild Thing or supported backbend. Increase total practice to 30–40 minutes once a week.
- Week 4 (consolidate & test): 3 sessions. Test metrics: single-leg hold time, cumulative plank time, hip extension measure. Add nature-mindfulness element: 5-minute post-practice sit observing surroundings.
Safety checklist & when to seek professional advice
- Get a medical check if you have cardiovascular disease, uncontrolled hypertension, recent surgery, or pregnancy concerns.
- If pain is sharp, burning, or persists beyond 48 hours after practice, stop and consult a clinician.
- Build gradually; soreness is normal, severe pain is not.
- For known musculoskeletal issues (disc herniation, rotator cuff tears, recent ACL repair), consult a physical therapist for tailored modifications.
Frequently Asked Questions (10)
1. How often should I practice these outdoor poses to see strength gains?
Aim for 3–4 sessions per week (20–40 minutes) with daily short micro-practices (5–15 minutes) for faster gains. Pair pose holds with dynamic repetitions for strength improvements. World Health Organization
2. Can outdoor yoga replace my gym strength training?
Outdoor yoga builds meaningful strength, especially in bodyweight control and stability. For maximal hypertrophy or heavy loading, complement yoga with targeted resistance training. Yoga is excellent for functional strength, mobility, and balance.
3. Is it safe to practice on uneven surfaces like grass or sand?
Uneven surfaces add proprioceptive challenge and can improve ankle strength, but increase risk of twists. Start on a stable surface, then progress to grass or sand once alignment and ankle stability improve. Use a mat where possible.
4. What’s the minimum time in nature to get mental health benefits?
Short exposures (even 10–20 minutes) can improve mood and attention, and two hours per week of nature contact is associated with better wellbeing in studies. Regularity matters more than duration per single session.
5. How do I avoid yoga injuries?
Warm up, prioritize alignment over depth, use modifications, progress gradually, and listen to pain signals. If unsure, work with a qualified instructor for a few sessions.
6. Can beginners do poses like Wild Thing or Plank flows?
Beginners should build to these poses: start with supported variations (forearm plank, supported backbends) and only progress when core and shoulder strength are adequate.
7. Is outdoor heat or sun a concern?
Yes: practice during cooler parts of the day, stay hydrated, use sun protection, and shorten holds in high heat. Heat increases heart rate and perceived exertion — scale intensity accordingly.
8. How should I pair breathing with these poses?
Use steady, diaphragmatic breathing. Inholds focus on smooth inhales and exhales (e.g., 4–6 breath cycles). For flows, match movement to breath cadence (exhale on effort, inhale on lengthening).
9. Will yoga improve my posture?
Yes — regular practice that strengthens the posterior chain and opens chest (Bridge, Down Dog, Warrior II) supports better posture over time.
10. How do I progress when I plateau?
Increase hold time, add reps (e.g., more plank lowers), introduce single-leg or unilateral variations, or reduce support (no wall). Track metrics (hold time, reps) and incrementally overload by ~10% each week.
Sample 20-minute outdoor sequence (all-levels)
- Warm-up (3 minutes): hip circles, shoulder rolls, cat–cow.
- Sun salutation-lite (3 minutes): 3 rounds of mountain → forward fold → half-lift → downward dog → plank → child’s pose.
- Strength circuit (10 minutes): Warrior II 45s each side; Chair 45s; Bridge 3 x 30s holds; High plank flow 6 reps (knee-down if needed).
- Balance & cool-down (4 minutes): Tree 30s each side; gentle supine twist; 1–2 minutes mindful breathing.
Final thoughts
Outdoor yoga blends the best of mindful movement and nature’s calming effects to strengthen body and brain together. Start simply, build consistently, and pay close attention to alignment and breath. Over weeks you’ll notice better balance, stronger legs and core, improved posture, and calmer focus — all amplified by fresh air and green space.
Call to action: Step outside, roll out your mat, and try the mini-plan for Warrior II, Tree, and Down Dog — 10 minutes today can start the change.
References
- A Systematic Review of Yoga Interventions on the Mental Health of … — PubMed Central. Published 2025 (article landing page). URL: https://pmc.ncbi.nlm.nih.gov/articles/PMC12068460/
- Associations between Nature Exposure and Health: A Review of the Evidence — PubMed Central. Published 2021. URL: https://pmc.ncbi.nlm.nih.gov/articles/PMC8125471/
- Physical activity – World Health Organization (WHO) — WHO fact sheet: Physical activity. Published 2024 (WHO guidelines summary). URL: https://www.who.int/initiatives/behealthy/physical-activity
- Safety and Prevention of Injuries in Yoga — PubMed Central. Published 2024/2025 (review on yoga injuries and prevention). URL: https://pmc.ncbi.nlm.nih.gov/articles/PMC11495307/
- Effects of Yoga on Mental and Physical Health: A Short Summary of … — PubMed Central (overview of research evidence on yoga). Published 2012 (summary). URL: https://pmc.ncbi.nlm.nih.gov/articles/PMC3447533/
- Overview of Systematic Reviews: Yoga as a Therapeutic Intervention — PubMed Central. Published 2013. URL: https://pmc.ncbi.nlm.nih.gov/articles/PMC3670548/
- Psychology Works: Fact Sheet — Benefits of Nature Exposure — Canadian Psychological Association. Published 2023. URL: https://cpa.ca/psychology-works-fact-sheet-benefits-of-nature-exposure/
- World Health Organization 2020 guidelines on physical activity and … — British Journal of Sports Medicine (overview of WHO 2020 guidelines). Published 2020. URL: https://bjsm.bmj.com/content/54/24/1451
- Yoga: Effectiveness and Safety — National Center for Complementary and Integrative Health (NCCIH). Published online (summary on safety and effectiveness). URL: https://www.nccih.nih.gov/health/yoga-effectiveness-and-safety
- Safety and potential risks of Yoga: A review (PDF) — Khel Journal (systematic review of yoga risks). Published 2023. URL: https://www.kheljournal.com/archives/2023/vol10issue3/PartC/10-3-40-408.pdf
