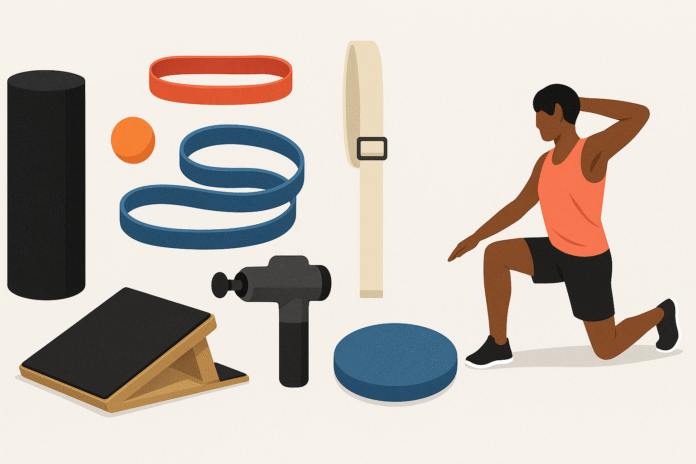
You don’t need a full-time training staff to move better, feel looser, and sidestep nagging injuries. With the right seven essential tools for increasing mobility and preventing injury, you can build a quick, reliable routine that fits before a lift, after a run, or on a lunch break. This guide shows you exactly what to buy (or substitute), how to use each tool step by step, how often to do it, and how to track progress—without guesswork.
Medical disclaimer: The guidance below is educational and general. If you have pain, a recent injury, or a medical condition, speak with a qualified healthcare professional for personalized advice.
Key takeaways
- Mobility improves fast when you mix soft-tissue work, targeted stretching, light strengthening, and balance drills—often in minutes, and measurably in weeks.
- Short, consistent sessions win. Two to four mini-sessions per week (10–20 minutes) routinely beat occasional marathon stretch days.
- Order matters. Warm up dynamically, then mobilize, then activate and groove patterns you’ll actually use.
- Measure to stay motivated. Simple tests (knee-to-wall for ankle, overhead reach for shoulders, single-leg balance time) let you see progress.
- Safety beats intensity. Mild discomfort is fine; sharp pain or numbness means stop or scale.
Tool 1: Foam Roller (Self-Myofascial Release)
What it is & why it’s worth it
A foam roller is a dense cylinder you roll under large muscle groups to reduce stiffness and briefly increase range of motion. Used before training, it can help you access better positions; used after, it may reduce muscle soreness.
Core benefits
- Short-term increases in joint range of motion
- Helps reduce perceived muscle soreness after hard sessions
- Doesn’t meaningfully reduce strength or power when used briefly as part of a warm-up
Requirements & budget
- Equipment: Standard 18–36″ medium-density roller.
- Cost: $10–$40.
- Low-cost alternatives: A rolled yoga mat, a firm towel roll, or a water bottle (partially filled for comfort).
Step-by-step (beginner-friendly)
- Scan: Spend 10–20 seconds rolling each target area (calves, quads, adductors, glutes, lats, thoracic spine) to identify “hot spots.”
- Melt: On tight zones, pause and take 2–3 slow breaths; gently oscillate or bend/extend the joint for 15–30 seconds.
- Move: Follow with 5–10 active reps using the new range (e.g., bodyweight squats after quad rolling).
Modifications & progressions
- New to rolling? Use a softer roller and shorter bouts (10–15 seconds per area).
- Progress: Increase total time to ~60–90 seconds per big muscle group, or add gentle contract–relax breathing (inhale into tension, exhale and sink).
- Advanced: Use a textured or vibrating roller sparingly for stubborn areas.
Frequency, duration & metrics
- Frequency: 3–5 days/week around training.
- Dose: ~1–2 minutes per muscle group, 6–10 minutes total.
- Metrics: Re-test a movement (deep squat depth, hip hinge ease) immediately after—aim to feel smoother, not “bruised.”
Safety, caveats & common mistakes
- Avoid rolling directly on joints, bony landmarks, or the low back without support.
- More pressure is not always better; seek mild-to-moderate discomfort only.
- Rolling alone doesn’t “fix” positions—pair with active mobility.
Mini-plan example
- 30 sec quads → 30 sec glutes each side.
- 30 sec thoracic spine (upper back) over the roller with small extensions.
- 10 bodyweight squats and 10 hip hinges to “lock in” range.
Tool 2: Lacrosse (Trigger-Point) Ball
What it is & why it’s worth it
A hard ball (lacrosse, rubber, or a “peanut” duo-ball) targets small hot spots your roller can’t reach—think glute med, hip rotators, pec minor, calves’ lateral head, and foot arch.
Core benefits
- Precise pressure for sticky spots in hips, shoulders, and arches
- Can reduce tenderness and improve short-term mobility in specific directions (e.g., hip rotation)
Requirements & budget
- Equipment: Lacrosse ball or equivalent.
- Cost: $3–$15.
- Low-cost alternatives: Tennis ball (gentler), cricket ball (firmer), or a tightly rolled sock ball.
Step-by-step
- Pinpoint: Place the ball on a wall or floor at the target spot.
- Press & breathe: Gentle pressure; take 4–5 slow breaths.
- Glide the tissue: Add small arcs or move the nearby joint through a short range (e.g., internal/external hip rotation). 20–40 seconds.
Modifications & progressions
- Start against a wall to reduce load; progress to the floor to increase pressure.
- Use a peanut ball along the spine (avoid direct pressure on vertebrae; sit in the groove).
Frequency, duration & metrics
- Frequency: 2–4x/week or as a 2-minute pre-lift primer.
- Dose: 30–60 seconds per spot, 2–4 spots per session.
- Metrics: Compare shoulder reach (hand behind back wall test) or hip rotation before/after.
Safety & pitfalls
- Skip numbness/tingling; avoid aggressive pressure near the neck or groin.
- Don’t chase pain—if it spikes, ease up or reposition.
Mini-plan example
- 45 sec glute med (side of hip) each side.
- 30 sec pec minor (front of shoulder) against wall each side.
- 6–8 band pull-aparts or scap slides to reinforce.
Tool 3: Resistance Bands (Mini and Long Loop)
What they are & why they’re worth it
Light elastic bands add gentle resistance that “turns on” underused muscles and takes joints through full, controlled arcs. That combination—activation plus end-range control—cements mobility gains.
Core benefits
- Builds strength at the new end ranges you just opened with soft-tissue work
- Supports joint-friendly mobility drills (e.g., banded hip airplanes, ankle dorsiflexion mobilizations)
- Portable, cheap, and endlessly scalable
Requirements & budget
- Equipment: 1–2 mini-bands and 1 long loop (light/medium).
- Cost: $10–$30 for a set.
- Low-cost alternatives: A long towel for isometrics; old bicycle inner tube (cleaned).
Step-by-step (sample lower-body)
- Ankle prep: Loop a long band low and anchor; step in so it pulls the shin backward just above the ankle. Rock the knee forward over toes for 8–12 smooth reps.
- Hip activation: Mini-band above knees. 10–15 lateral steps each direction; then 8–10 bodyweight squats, pushing the knees gently out.
- Glute finisher: 10–12 single-leg bridges per side, focusing on full hip extension.
(Upper-body sample below in the mini-plan.)
Modifications & progressions
- Beginner: Slower tempo, lighter bands, fewer reps.
- Progress: Heavier bands, longer time under tension (3–4 seconds each direction), isometric holds at end range (10–20 seconds).
Frequency, duration & metrics
- Frequency: 3–5x/week pre- or post-workout.
- Dose: 2–4 drills × 1–2 sets each (5–10 min).
- Metrics: Track controlled reps at end range (e.g., 10-second isometric hold at full shoulder flexion), or weekly photos of overhead reach depth.
Safety, caveats & common mistakes
- Don’t let the band yank you—control the return.
- If the band alters your mechanics (e.g., knees collapsing inward), drop a level.
Mini-plan example (upper-body)
- 12–15 band pull-aparts (palms down).
- 8–10 face pulls with a long loop, 2-second hold.
- 6–8 band-assisted thoracic rotations per side (half-kneeling).
Tool 4: Stretching Strap (for Contract–Relax / PNF)
What it is & why it’s worth it
A simple strap (or belt/towel) lets you use contract–relax techniques to safely expand flexibility—especially for hamstrings, hip flexors, and calves. The gentle contraction “teaches” your nervous system to allow more range.
Core benefits
- Efficient, targeted increases in range of motion
- Useful both after training and on off days
- Teaches you to own end ranges with controlled breathing
Requirements & budget
- Equipment: Nylon strap, yoga strap, belt, or long towel.
- Cost: $0–$15.
- Low-cost alternatives: Bath towel; bedsheet.
Step-by-step (contract–relax hamstring)
- Set up: Lie on your back, strap around mid-foot, other leg straight on floor.
- Stretch: Gently pull the leg up until you feel a mild hamstring stretch.
- Contract (5–8 seconds): Push your heel down into the strap (as if trying to lower the leg) at ~30–50% effort.
- Relax & gain: Exhale, relax, and pull the strap to a new, comfortable end range (5–10 seconds).
- Repeat: 2–3 cycles per side.
Modifications & progressions
- New to PNF? Use shorter contractions (3–5 seconds) and very gentle effort.
- Progress: Add a second contraction per cycle or include an antagonist contraction (contract the quads at end range for 3–5 seconds).
Frequency, duration & metrics
- Frequency: 2–4x/week for target areas.
- Dose: 2–3 cycles per muscle, total time ~60–90 seconds.
- Metrics: Sit-and-reach distance; straight-leg raise angle (photo or goniometer app).
Safety & pitfalls
- Avoid breath-holding; exhale during the “gain” phase.
- Stop for sharp pain, radiating symptoms, or hamstring cramps (reduce effort next time).
Mini-plan example
- Contract–relax hamstrings: 2 cycles/side.
- Hip flexor strap stretch (prone or half-kneeling): 2 cycles/side.
- 8–10 controlled leg lowers each side to retain new range.
Tool 5: Massage Gun (Percussive Therapy)
What it is & why it’s worth it
A handheld percussive device delivers rapid pulses to soft tissue. Used briefly, it can reduce feelings of tightness, increase short-term flexibility, and ease post-workout stiffness.
Core benefits
- Fast “loosen up” effect in calves, quads, hip flexors, pecs, and upper traps
- May reduce perceived stiffness and soreness after fatiguing sessions
- Easy to dose: 30–90 seconds per area
Requirements & budget
- Equipment: Massage gun with rounded head.
- Cost: $40–$600 depending on brand/features.
- Low-cost alternatives: Manual massage stick, rolling pin, or vibrator massage wand used gently over muscle (never on bone/joints).
Step-by-step
- Select a soft head and low speed.
- Float on the muscle (don’t jam): 15–30 seconds scanning, then 15–30 seconds on tight zones.
- Move the joint lightly while you massage (e.g., flex/extend knee during quad work).
- Follow with movement (e.g., 8–10 lunges or arm circles).
Modifications & progressions
- Increase time only if tissue tolerates it (up to ~2 minutes per big muscle).
- Explore pre-run calves or pre-press pecs for quick wins.
Frequency, duration & metrics
- Frequency: As needed, usually 3–6 days/week around training.
- Dose: 30–120 seconds per muscle group.
- Metrics: Re-test end-range motion (e.g., ankle dorsiflexion knee-to-wall), or note perceived stiffness (0–10 scale).
Safety & pitfalls
- Don’t use on fresh injuries, swelling, or numb areas; avoid bony prominences, front of neck, or directly over nerves.
- Low speed + light pressure beats “jackhammering.”
Mini-plan example
- 45 sec calves per side → 45 sec quads per side.
- 8–10 ankle rocks and 10 split squats each side to cement gains.
Tool 6: Balance Pad or Board
What it is & why it’s worth it
A squishy pad or wobble board turns basic stances and hops into proprioceptive training, sharpening your ankle, knee, and hip reflexes. Better joint control = fewer missteps and more resilient landings.
Core benefits
- Improves postural control and single-leg stability
- Helps reduce the incidence of ankle sprains when trained consistently
- Prepares you for real-world, uneven-surface demands
Requirements & budget
- Equipment: Foam balance pad or wobble board.
- Cost: $15–$60.
- Low-cost alternatives: Folded yoga mat, couch cushion, or a thick towel.
Step-by-step (starter circuit)
- Barefoot stand: Single-leg on the pad, knee slightly soft, 20–30 seconds.
- Eyes forward → eyes side: Keep hips level; avoid gripping toes.
- Add reach: Lightly tap the free heel forward/side/back (3-point reach).
- Hop & stick (progression): Small hop, soft landing, hold 2 seconds.
Modifications & progressions
- Beginner: Two-leg stance; use a wall fingertip for balance.
- Progress: Eyes-closed holds (safety first), med-ball passes, rotational catches, lateral hops.
Frequency, duration & metrics
- Frequency: 2–4x/week; 5–10 minutes is plenty.
- Metrics: Single-leg balance time, controlled 3-point reach distances, hop-and-stick quality (quiet landings).
Safety & pitfalls
- Start near a wall or sturdy object.
- Stop if ankles collapse inward or knees dive toward midline—regress and rebuild.
Mini-plan example
- 2 × 20 sec single-leg stands/side.
- 2 × 5 three-direction toe taps/side.
- 5 small hop-and-sticks/side.
Tool 7: Slant Board (Calf Stretch Wedge)
What it is & why it’s worth it
A slanted wedge positions your ankle for an effective calf stretch and knee-over-toe rocking, both of which can improve dorsiflexion—vital for deep squats, pain-free running mechanics, and safer landings.
Core benefits
- Focused ankle mobility work that’s easy to standardize
- Useful for stiff calves/Achilles after running or sitting
- Carries over to squat depth, lunge comfort, and stride mechanics
Requirements & budget
- Equipment: Adjustable or fixed-angle slant board (15–30°).
- Cost: $20–$60.
- Low-cost alternatives: A curb, ramp, sturdy wedge of books, or a rolled yoga mat against a wall.
Step-by-step
- Bilateral stand: Heels down on the wedge, knees straight—hold 20–30 seconds.
- Bent-knee version: Soften knees slightly to bias the soleus—20–30 seconds.
- Knee-to-wall rocks: One foot on wedge facing a wall; drive knee toward wall over toes for 8–12 controlled reps.
Modifications & progressions
- Adjust wedge angle to keep sensations at mild stretch.
- Progress from two-leg to single-leg holds; add gentle isometric calf contractions (push toes down for 5 seconds, then relax deeper).
Frequency, duration & metrics
- Frequency: 3–5x/week.
- Dose: 1–2 minutes per leg in total.
- Metrics: Knee-to-wall test: measure distance from big toe to wall where the knee touches without heel lift; aim for gradual increases.
Safety & pitfalls
- Keep heel contact; don’t force range or bounce.
- For Achilles soreness, emphasize bent-knee variations and short holds; consult a pro if pain persists.
Mini-plan example
- 30 sec straight-knee wedge stretch → 30 sec bent-knee stretch (each leg).
- 10 knee-to-wall rocks/leg, slow and controlled.
Quick-Start Warm-Up Checklist (8–10 minutes)
- Raise temp (1–2 min): brisk walk, skipping, or light bike.
- Foam roll (2–3 min): quads, glutes, thoracic spine.
- Mobilize sticky joint (2–3 min): slant-board ankle rocks + lacrosse ball to hip/pec as needed.
- Activate (2–3 min): mini-band lateral steps, band pull-aparts, or glute bridges.
- Rehearse pattern (1–2 min): bodyweight squats, split squats, or arm-bar/press-up progressions.
Tip: Save longer stretching-strap sessions for after training or on rest days.
Troubleshooting & Common Pitfalls
- “I don’t feel lasting change.” Add activation after soft-tissue. Roll, then immediately perform end-range isometrics or banded control drills.
- “I’m sore from rolling.” Decrease pressure, use a softer roller, halve the time, and interleave with deep breaths.
- “Balance drills feel impossible.” Start on the floor, barefoot, eyes open; use fingertip support. Build 10–15 second holds before adding a pad.
- “Calf stretching tingles.” Back off angle or switch to bent-knee versions; tingling is a red flag—stop and reassess.
- “No time.” Use micro-sessions: 90 seconds foam roll + 90 seconds band work + 60 seconds patterning.
How to Measure Progress (Simple, Repeatable Tests)
- Ankle (knee-to-wall): Barefoot, knee touches wall without heel lift. Record toe-to-wall distance in cm.
- Hamstrings (straight-leg raise): Use a phone photo from the side; estimate hip angle or mark progress with strap hole numbers.
- Overhead reach: Back, butt, and ribs to wall—can you get thumbs to the wall without arching? Note distance.
- Single-leg balance: Time a quiet hold; aim for 30+ seconds.
- Subjective stiffness/soreness: 0–10 scale before and after sessions, and next-morning check-ins.
Re-test weekly and jot results in your notes app.
A Simple 4-Week Starter Plan (20 minutes, 3–4 days/week)
Week 1 — Build the habit (ease in)
- Foam roll: quads, glutes, thoracic spine (45 sec each area)
- Slant board: 30 sec straight-knee + 30 sec bent-knee per leg
- Lacrosse ball: 30–45 sec per side to hips or pecs
- Mini-band: 12 lateral steps each way + 10 squats
- Balance pad: 2 × 20 sec single-leg holds per side
- Strap: 2 contract–relax hamstring cycles per side
Week 2 — Own the new range
- Same flow, add end-range isometrics (10-second holds) in squat/lunge and overhead reach.
- Massage gun: 30–45 sec calves or quads pre-session.
Week 3 — Add control and complexity
- Foam roll: keep total to <6 minutes.
- Slant board: add 10 knee-to-wall rocks/leg.
- Mini-band: add 8–10 single-leg bridges per side.
- Balance pad: add 3-point toe taps (5 each direction).
- Strap: add a second PNF cycle to hamstrings and hip flexors.
Week 4 — Consolidate & test
- Reduce foam roll time; keep activation.
- Progress balance to small hop-and-stick (5/side).
- Re-test ankle knee-to-wall, straight-leg raise, overhead reach, and single-leg balance.
- Note where you improved most; keep those drills 2–3x/week going forward.
FAQs
1) How should I order these tools in a single session?
Warm up → foam roll/lacrosse ball on tight areas → joint-specific mobility (slant board, strap) → activation with bands → balance/control → practice the movement you plan to train.
2) How long will it take to see results?
Many people feel easier movement immediately after a session. For durable flexibility gains, plan on consistent work for 2–4+ weeks. Keep each session short and repeatable.
3) Do I have to roll every day?
No. Two to five short sessions per week work well. If you train most days, mini-doses before training are fine.
4) Will static stretching before workouts make me weaker?
Long holds can reduce strength/power if you overdo it. Brief holds (≤60 seconds per muscle) within a full warm-up are unlikely to matter for most people. Save longer strap sessions for after training or off days.
5) What if rolling or the massage gun makes me sore?
Dial the pressure way down, shorten time, and switch to breathing-focused, gentle sweeps. You’re aiming for “ahh,” not “ow.”
6) I have flat feet/ankle stiffness—where should I start?
The slant board plus calf soft-tissue and ankle rocks are a powerful combo. Track knee-to-wall progress weekly.
7) Can resistance bands really improve flexibility?
Yes—strength work through full range can improve range of motion similarly to stretching, and it also helps you control that range.
8) I keep rolling the same tight spots—why don’t they stay loose?
Open the tissue (roller/ball), then own the range with banded control and a few reps of the actual movement you care about. Consistency beats intensity.
9) How do I prevent ankle sprains specifically?
Include balance work 2–4x/week for 6+ weeks (single-leg stands, 3-point reaches, hop-and-stick), plus ankle mobility and calf strength.
10) Should I use all seven tools every day?
No. Pick 2–4 tools that target today’s priorities. Rotate across the week.
Conclusion
Mobility isn’t mysterious. When you combine soft-tissue tools (roller, ball, massage gun), range builders (strap, slant board), and control builders (bands, balance pad), joints feel freer and movements feel safer—often right away, and more so over a month. Keep sessions short, stack them onto workouts, and measure your wins.
Copy-ready CTA: Pick two tools from this list and do a 10-minute circuit today—your joints will thank you tomorrow.
References
- A Meta-Analysis of the Effects of Foam Rolling on Performance and Recovery, Frontiers in Physiology, 2019. https://pmc.ncbi.nlm.nih.gov/articles/PMC6465761/
- Foam Rolling Training Effects on Range of Motion: A Systematic Review and Meta-Analysis, International Journal of Environmental Research and Public Health, 2022. https://pmc.ncbi.nlm.nih.gov/articles/PMC9474417/
- The Effects of Massage Guns on Performance and Recovery: A Systematic Review, Journal of Functional Morphology and Kinesiology (MDPI), 2023. https://pmc.ncbi.nlm.nih.gov/articles/PMC10532323/
- Effects of Vibration Foam Rolling on Pain, Fatigue, and Delayed Onset Muscle Soreness: A Systematic Review and Meta-Analysis, Healthcare (MDPI), 2025. https://pmc.ncbi.nlm.nih.gov/articles/PMC12193259/
- THE EFFECTS OF SELF‐MYOFASCIAL RELEASE USING A FOAM ROLL OR ROLLER MASSAGER ON JOINT RANGE OF MOTION, MUSCLE RECOVERY, AND PERFORMANCE: A SYSTEMATIC REVIEW, International Journal of Sports Physical Therapy, 2015. https://pmc.ncbi.nlm.nih.gov/articles/PMC4637917/
- Chronic effects of stretching on range of motion with consideration of potential moderating variables: A systematic review with meta-analysis, PLoS ONE, 2023. https://pmc.ncbi.nlm.nih.gov/articles/PMC10980866/
- Does pre-exercise static stretching inhibit maximal muscular performance? A meta-analytical review, Scandinavian Journal of Medicine & Science in Sports, 2013. https://pubmed.ncbi.nlm.nih.gov/22316148/
- Acute Effects of Static Stretching on Muscle Strength and Power: An Attempt to Clarify Previous Caveats, Frontiers in Physiology, 2019. https://pmc.ncbi.nlm.nih.gov/articles/PMC6895680/
- Strength Training versus Stretching for Improving Range of Motion: A Systematic Review and Meta-Analysis, International Journal of Sports Physical Therapy, 2021. https://pmc.ncbi.nlm.nih.gov/articles/PMC8067745/
