





















By Grace Watson
Nobody hands you a manual for bending over correctly. Most people figure out how to pick things up off the floor by copying whatever their parents did, and for a lot of us that meant rounding the spine like a fishing rod every single time. Then someone at a gym says the words “hip hinge” and suddenly you’re supposed to know how to fold at the hips instead of the waist, keep a flat back, and load a kettlebell or a barbell without turning your lower back into the weak link.
You don’t need a personal trainer standing behind you to learn this pattern. You need a clear breakdown of the mechanics, a few low-tech tools you probably already own, and a progression that builds the movement in layers instead of throwing you straight under a loaded bar. That’s what this guide walks through: what the hip hinge actually is, why it’s worth the practice, and a self-coaching system you can run entirely on your own using a mirror, your phone camera, and a broomstick.
What the Hip Hinge Actually Is
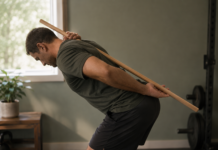
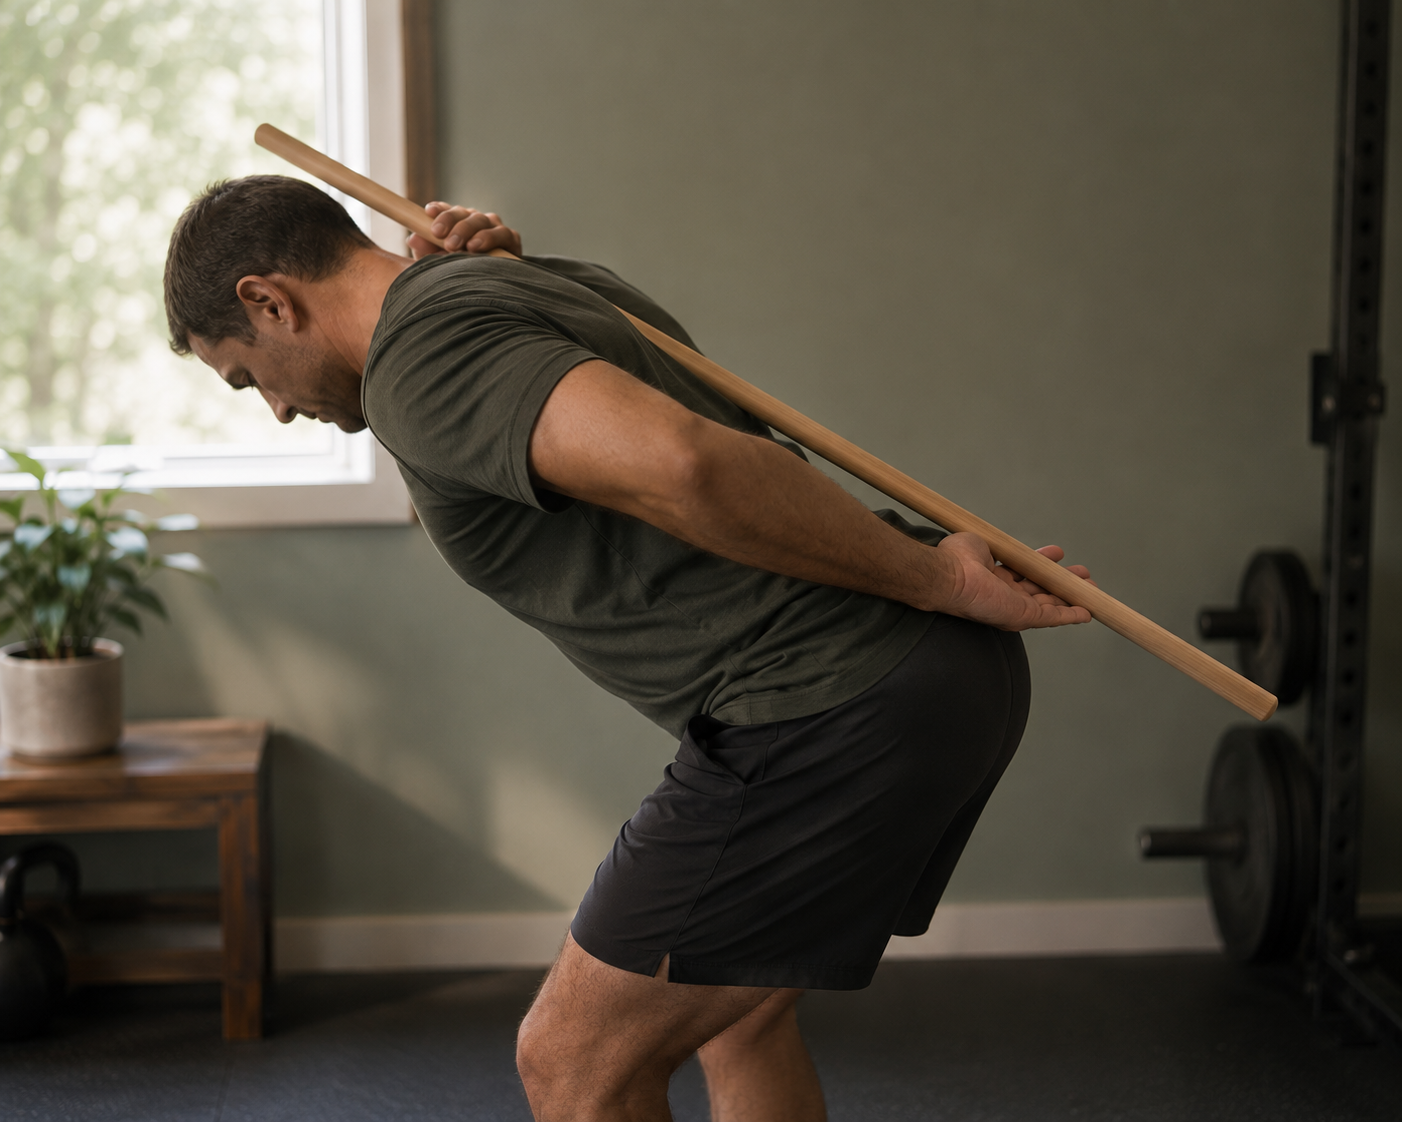
The hip hinge is a movement where your pelvis and torso fold forward from the hip joint while your spine stays in a relatively neutral, unmoving position. According to Physiopedia, the pattern is defined by keeping “the thoracic and lumbar spine and pelvis” in a steady, neutral alignment while the body bends forward from the hips rather than the lower back. The knees stay soft, but this is not a squat. In a squat, the knees travel forward and the hips drop mostly straight down. In a hinge, the hips shift backward, the torso tips forward like a seesaw, and the knee bend is minimal, just enough to stay comfortable.
Picture a drawer sliding out of a cabinet. Your hips are the drawer, sliding backward as your chest tips forward to counterbalance them. The motion happens almost entirely at the hip joint, driven by the glutes and hamstrings, while the spine simply comes along for the ride without rounding or arching.
This is the pattern underneath the deadlift, the kettlebell swing, the Romanian deadlift, the good morning, and honestly, a good chunk of daily life: loading a dishwasher, lifting a suitcase into a car trunk, picking a toddler up off the ground. Physiopedia notes the hinge is foundational to squats, kettlebell swings, and deadlifts, and that it also shows up in sports contexts like the setup position of a golf swing.
“The hip hinge is a movement where the thoracic and lumbar spine and pelvis stay in a relatively neutral position while the subject bends forward.” That single sentence is the entire test for whether you’re doing it right. If your spine is moving, you’re not hinging. If your spine is still and your hips are traveling back, you are.
Why It’s Worth Learning Properly
The hip hinge earns its reputation as a foundational pattern for a few practical reasons.
It protects your lower back
When you bend forward using your spine instead of your hips, the load on your lumbar discs and connective tissue increases substantially, especially the moment you add any external weight. Learning to hinge shifts that load into the glutes and hamstrings, muscles built to handle heavy, repeated tension. Physiopedia points to research on the hip hinge as a rehabilitation tool, describing hinge-focused training as reducing reported pain during movement testing and identifying it as an effective method for improving hamstring flexibility and dynamic balance in young adults dealing with tight hamstrings.
It’s the base layer for real strength training
If you plan to ever deadlift, swing a kettlebell, or do a Romanian deadlift with a barbell or dumbbells, the hinge is not optional technique polish, it’s the entire skill. Wikipedia’s breakdown of deadlift mechanics describes the movement as emphasizing hip hinging rather than squatting, noting that in proper form “the knees should not be bent so deeply as to form a squat,” and that variations like the Romanian deadlift focus specifically on hinging at the hips with only a slight knee bend. Skip the hinge and you’re left trying to muscle through a deadlift with your quads and lower back doing work they were never meant to do alone.
It supports the strength training you’re already supposed to be doing
The CDC recommends that adults get at least 150 minutes of moderate-intensity aerobic activity a week, plus a minimum of two days of muscle-strengthening activity that targets all the major muscle groups, including the legs, hips, and back. A properly executed hinge is one of the most efficient ways to hit hips, hamstrings, glutes, and back muscles in a single movement pattern, which makes it worth the upfront time investment.
The Real Problem With Learning It Alone
Here’s the honest obstacle: you cannot see your own spine. When a coach watches you hinge, they’re looking at you from the side, checking whether your lower back rounds, whether your hips shoot straight down instead of back, whether your knees cave in. You don’t have that vantage point on your own body in real time. That’s the entire reason coaching exists for this movement, and it’s also exactly the gap that a phone camera, a mirror, and a dowel rod can close.
The most common self-taught mistakes tend to fall into a short list, and once you know what to look for, most of them are fixable without anyone else in the room.
Notice that almost every fix in that table comes down to feedback you can generate for yourself: how something feels, what a wall tells you, where a bar sits relative to your shins. None of it strictly requires a second pair of eyes, though a phone propped on a shelf gets you close to the same information a coach would have.
Your Self-Coaching Toolkit
Before you touch any weight, gather four cheap or free tools. Each one replaces a specific piece of what a coach would otherwise tell you.
The four tools that replace a coach’s eyes
- A broomstick or dowel rod. Held along your back, it touches three points when your spine is neutral: the back of your head, your upper back, and your tailbone. If any of those three points lift off the stick during the hinge, your spine moved when it shouldn’t have.
- A full-length mirror, positioned to your side. A front-facing mirror is almost useless for checking a hinge. You need a side view to see whether your back stays flat and whether your hips travel backward.
- Your phone camera, propped up at hip height. Record five reps from the side, then watch in slow motion. This is the single most useful tool on this list because it lets you see exactly what a coach would see, on your own schedule.
- A wall. Standing with your glutes a few inches from a wall gives you an immediate, physical cue: if your hips touch the wall as you hinge back, you’re moving correctly. If you never get close, you’re squatting instead of hinging.
The Step-by-Step Progression
Rushing straight to a loaded barbell deadlift is how most self-taught lifters end up frustrated or sore. Build the pattern in layers instead, spending at least a few sessions on each stage before adding load. This progression is designed to be run two to three times a week, which lines up with the muscle-strengthening frequency the CDC recommends for adults.
The Six-Stage Hip Hinge Progression
How to Film and Judge Your Own Form
A phone propped on a shelf or a stack of books does most of the job a coach’s eyes would otherwise do, as long as you set it up correctly.
- Camera height: hip height, not floor level or eye level. Floor-level angles distort how much your hips actually travel back.
- Camera distance: far enough to capture your whole body from head to feet, close enough that your silhouette fills most of the frame.
- Angle: directly from the side, perpendicular to the direction you’re facing. A three-quarter angle hides spinal rounding.
- Playback speed: slow it down. Most form breakdowns happen in a fraction of a second, right around the bottom of the movement.
When you review the footage, check these points in order, the same sequence a coach would typically scan:
- Does the lower back stay flat, or does it round or arch at any point?
- Do the hips travel backward first, before the knees bend?
- Does the weight (or your hands, if bodyweight) stay close to your legs throughout?
- Do the shoulders stay pulled back, or do they roll forward as fatigue sets in?
- Does the chest and hips rise together at the top, or does one shoot up before the other?
Wikipedia’s summary of deadlift form errors lines up closely with what shows up most often on self-recorded video: shoulders that protract and disengage the stabilizing back muscles, a bar or weight that drifts too far from the body and forces the back to round or the weight onto the toes, and insufficient knee bend on the way down, which pushes the spine to round to reach the floor. All three are visible on a basic side-angle video, which is exactly why filming yourself closes so much of the gap a coach would otherwise fill.
Programming It Into Your Week
Two to three short hinge-focused sessions a week is plenty while you’re building the pattern, which fits comfortably inside the CDC’s recommendation of at least two muscle-strengthening sessions weekly for adults. Mayo Clinic’s general strength training guidance suggests choosing a resistance level that fatigues the target muscles by around 12 to 15 repetitions, a useful reference point once you move into loaded hinge variations like kettlebell deadlifts.
A simple weekly template while you’re still learning:
Sample learning-phase week
- Day 1: Dowel wall-tap drill + standing hinge, 3 sets each, filmed
- Day 2: Rest or light walking
- Day 3: Kickstand good mornings + band-resisted hinge, 3 sets each
- Day 4: Rest
- Day 5: Loaded hinge variation (kettlebell or dumbbell), filmed and compared to Day 1 footage
Progress by adding load only when your form on video looks the same at the new weight as it did at the previous one. Progress by adding reps or sets if your form starts to break down before you’ve hit your target number, that’s a sign the pattern needs more practice before more resistance.
Red Flags: When You Should Bring In a Professional
Self-coaching works well for building a foundational pattern, but it has limits. Mayo Clinic recommends checking with a healthcare professional before starting a new exercise program if you have a chronic condition such as heart disease, diabetes, or arthritis, or if you haven’t exercised in a long stretch of time. That guidance applies here too.
Stop and consult a doctor or physical therapist, rather than trying to self-correct, if you notice any of the following:
- Sharp, shooting, or radiating pain down a leg during or after hinging
- Numbness or tingling in the legs or feet
- Pain that doesn’t ease with rest over a few days
- A pre-existing back injury or diagnosed disc issue
- Persistent inability to keep your back flat even at very light loads, despite weeks of practice
None of that is meant to scare you off the movement. Most people learn a clean hip hinge with nothing more than patience, a dowel rod, and a phone camera. But this is still a load-bearing pattern for your spine, and a quick check-in with a professional is a reasonable step if something feels consistently off rather than just unfamiliar.
Building the Mobility That Makes the Pattern Click
A lot of the frustration people run into while learning the hip hinge on their own isn’t really a coordination problem, it’s a mobility problem wearing a coordination costume. Physiopedia’s summary of the hip hinge specifically calls out tight hip rotators and hamstrings as the main obstacle keeping people from hinging cleanly, and that matches what shows up on self-recorded video over and over: the back rounds not because someone forgot the cue, but because their hamstrings ran out of length before their torso reached the angle they were aiming for.
Spend five minutes before each hinge session on simple hamstring and hip mobility work. A standing hamstring stretch, a 90/90 hip stretch, or a few slow bodyweight good mornings with an exaggerated pause at your current end range all help. The goal isn’t to force new range of motion through sheer effort, it’s to let your body settle into a slightly deeper position over a few weeks of consistent practice. Trying to hinge past your current hamstring length by rounding the lower back defeats the entire purpose of the drill, so treat a shorter range with a flat back as more valuable than a deeper range with a rounded one.
This is also where patience pays off more than intensity. Someone practicing the wall-tap drill for ten minutes, three times a week, with a flat back the entire time, will typically own the pattern faster than someone grinding through daily sessions while letting form slip. The dowel and the wall aren’t just teaching tools, they’re also a built-in limiter that keeps you from practicing a wrong pattern into muscle memory.
Frequently Asked Questions
How long does it take to learn the hip hinge without a coach?
Most people can perform a recognizable, safe bodyweight hinge within one to two weeks of practicing the dowel and wall drills a few times a week. Loading it with real weight, kettlebells, dumbbells, or eventually a barbell, generally takes longer, often four to eight weeks of consistent practice, because the goal isn’t just moving correctly once but repeating it reliably under fatigue.
What’s the difference between a hip hinge and a squat?
In a squat, the knees bend significantly and travel forward, and the hips move mostly straight down between the ankles. In a hip hinge, the hips travel backward, the knee bend stays minimal, and the torso tips forward to counterbalance the hips. Wikipedia’s overview of deadlift technique specifically notes that the knees “should not be bent so deeply as to form a squat,” which is a useful test if you’re unsure which pattern you’re doing.
Can I learn the hip hinge with just bodyweight, no equipment at all?
Yes. The dowel rod helps but isn’t mandatory, a broom, mop handle, or even a yardstick works the same way. The wall-tap drill needs nothing but a wall. You can build a fully competent bodyweight hinge before ever touching a kettlebell or dumbbell.
Why does my lower back round every time I try to hinge?
This usually comes from one of two things: tight hamstrings limiting how far you can bend before your pelvis tucks under, or simply trying to go too deep too soon. Physiopedia identifies limited hip and hamstring mobility as the most common obstacle to a clean hinge. The fix isn’t to force more depth, it’s to stop the descent at the point where your back is still flat, even if that’s a smaller range than you expected, and let flexibility build gradually.
Is the hip hinge the same thing as a Romanian deadlift?
The hip hinge is the underlying movement pattern; the Romanian deadlift is one specific exercise built on that pattern. Wikipedia describes the Romanian deadlift as a deadlift variation that focuses on hinging at the hips while keeping a slight bend in the knees. Other exercises share the same hinge pattern, including kettlebell swings, good mornings, and conventional deadlifts.
Do I really need to film myself, or is a mirror enough?
A side-facing mirror helps, but you can’t watch a mirror and focus on your own body tension at the same time, and you can’t replay it in slow motion. A quick video takes the guesswork out of the equation and lets you compare sessions over time, which is closer to what an in-person coach would give you through repeated feedback.
References
- Physiopedia. “Hip Hinge.” https://www.physio-pedia.com/Hip_Hinge
- Wikipedia. “Deadlift.” https://en.wikipedia.org/wiki/Deadlift
- Centers for Disease Control and Prevention. “Physical Activity Guidelines for Adults.” https://www.cdc.gov/physical-activity-basics/guidelines/adults.html
- Mayo Clinic. “Exercise: 7 benefits of regular physical activity” and related safety guidance on starting a new exercise program. https://www.mayoclinic.org/healthy-lifestyle/fitness/in-depth/exercise/art-20048389
This article is for general educational purposes and isn’t a substitute for individualized guidance from a physical therapist, certified strength coach, or physician, especially if you have an existing injury or medical condition. Consult a doctor before starting a new exercise program.